
Making my own Chusen Tenugui (Japanese cotton hand towel)!
Have you ever wondered about the colorful, patterned cloths often found in souvenir shops? Those cloths are called “Tenugui”!

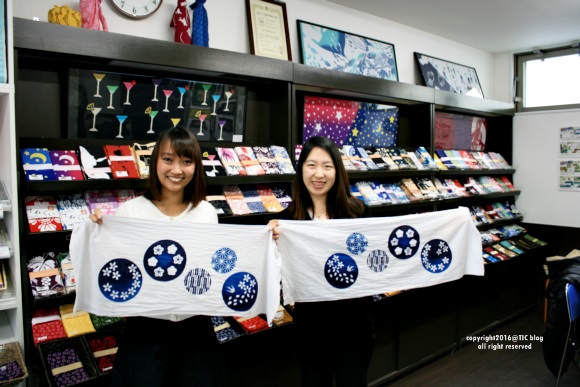
Tenugui (手ぬぐい) are a patterned, thin cotton cloth traditionally used as hand towels.
Nowadays, they are used as decoration, wrapping cloths, handkerchiefs, bandanas, etc. and they make perfect souvenirs.


This cloth is also used to make yukata (thin Japanese cotton gowns-summer kimono).
They come in a wide variety of patterns and colors. I recently got the chance to hand dye my own tenugui.

I am not very big on craft (not quite a do-it-yourselfer person)…
But surely I’ve done some Batik painting in my country prior coming to Japan. I imagined both Batik paint and Tenugui dyeing might be similar in some ways. I am very eager to participate in today’s lesson.
Read on to learn about my experience!
Tenugui have been around since the Nara Period (710-794) and began to be used by the commoners in the Edo Period (1603-1868). As time went on and Japan became more modernized, less people used tenugui. However, in the last ten years, they have become popular again; particularly as souvenirs.
The studio I went to to make my own tenugui is located near Keisei-Tateishi (京成立石)station, not very far from Asakasa.
ACCESS >> Click


Map >>
After being welcomed by the staff, we were led to watch an instructional DVD detailing the process of making tenugui.


As I watched the expert craftsman, I realized a lot of work goes into creating these cloths. From washing, air-drying and rolling the fabric, to hand-cutting the stencils.
And this is all before the dyeing process even begins.

What struck out the most to me was the seaweed-starch mixture they use when dyeing. Using a combination of different kinds of seaweed, they make a thick paste that is used to block out areas that are not to be dyed.
While watching the video, I began to anticipate which parts of the process I would be taking part in.
After the DVD, we were provided with aprons and rubber boots to protect our clothes and shoes.


We started the process with applying the starch mixture. By the way, this type of dyeing is called “resist dyeing”.
First I had to lay down the stencil, matching up with the pattern on the fabric, and swipe the spatula across to evenly spread the starch. Although I was nervous at first, the staff were very friendly and helpful and I was able to successful apply the mixture. Spreading the starch was a very satisfying feeling 🙂


Multiple layers of fabric are dyed at once so each layer had to have the starch applied.
The most difficult part for me was lining up the different layers of fabric. If you are a pro and you mess up this process, it could mean that, that roll of fabric is defective and can’t be sold.
No pressure at all >”<
Go slow and steady! But don`t worry, the friendly staff are there to help you every step of the way.


Next is the dyeing part. This particular process is called “Sashi-wake zome”.
This is a unique technique which allows you to dye with multiple colors using the same stencil. In order to prevent the different colors from mixing, you use the starch mixture to create walls or dykes around different sections.


This part was very fun as it is just like frosting a cake.
Use the piping bag to create thick, high walls around each section. The walls have to be high enough to prevent the dye from overflowing.


Now comes the dye!
Handling the watering cans of dye is a delicate process so we first practiced using water. Also, the dye is heated so we had to be careful holding the watering cans.
Gently pour the dye all over the pattern, making sure to saturate it well. Since multiple layers are dyed at once, a vacuum, activated with a pedal, is used to compress air from the bottom, pulling the dye all the way through (very clever!).
This was very satisfying as well!


There are different techniques of dyeing and we even had the chance to create gradient patterns.
To achieve this, I had a can of dark blue dye in one hand and a can of light blue dye in the other. I was then instructed to start with both cans in the middle but then start drizzling the dyes in opposite directions at the same time. This was kind of difficult to do but it doesn’t have to be perfect. Even though I didn’t think I had done a good job, the result came out very nice 🙂

Now that the dyeing is done, the fabric is vigorously washed in water to remove the starch. This is all done by hand so it was a good workout 😉
After cutting and drying, it is finished!


That’s all we experienced in our lesson today. However, the actual process by craftsman doesn’t finish here.
- After washing the fabric in water to remove excess starch and dye, fabric will be sun-day.
- Rolling by machine to smoothen the surface and get rid of any wrinkles.
- Folding of the dried fabric to the length of tenugui using rotating rod.
- 1 Tenugui size is about 35 am width x 90 cm long


Making the tenugui was a lot of fun and I was able to take home the beautiful cloths I had made.
Doing it myself also made me appreciate the work done by expert craftsman. Since the process was simplified for us, it was not too difficult to do. However, I am sure it would take years of training to do what the experts do.
If you are interested in trying something like this in Japan, check out our Tourist Information Center or stop by any of our locations all around Tokyo.
Tenugui craft experience
Price : 5,000 yen
Reservation : by yourself through the website http://souzou-kan.info/en/
If you are interested, check out the movie! >>
That’s all for today, see you next blog!


3 thoughts on “Making Chusen Tenugui – Japanese hand towel”